I warn you now - this post contains nothing but rambling about my own life.
New Job
On June 4th, I did the impossible - I started a new job. And it wasn't even web development! I'm now one of a few game programmers at Rullingnet, a company that develops games for the Vinci Tablet. I can't thank Ben King enough, for helping me land this position, although hopefully I'll be able to by developing a portfolio website for him. That is, once he's settled on a design.
Basically I develop really simple games that are intended to be played by very young children. You'd think that this would be boring, but it's actually far more interesting than I expected. It's given me a new appreciation for Unity3D, and I feel like I'm actually picking up a lot of new information. For the time being, I'm definitely quite pleased with where I am. It also helps that most of the work force is fairly young - my own supervisor graduated from the same program as me only one year prior. Despite this, I find that they're all good at what they do, and that makes being part of this team fairly fulfilling.
A Return to the Sketchbook
Unfortunately, having just started this job, and being an individual who doesn't adapt too quickly to change, I've found myself coming home feeling extremely drained. It's hard to motivate myself to open Photoshop, or work on any of my own projects. That said, there is a silver lining. I'm sure I'll adapt to this and get back on the bandwagon, but for now, I see this as a great opportunity to return to just doodling in my sketchbook. This is something I haven't really been able to do since I was very young, largely because of this deeply rooted fear of creating shitty art. If I make a mistake, I feel this overwhelming urge to turn the page and start afresh. The fear also keeps me from drawing much at all, and if one does not draw, one does not improve.
I've bought myself a brand new sketchbook, and I've set myself out some guidelines. For each day, I will reserve only two pages of the sketchbook - that is, two facing pages. Unless I happen to be feeling extremely creative and fill up that set space, I will limit myself to this. No turning the page to avoid looking at mistakes. No treating individual doodles like masterpieces that cannot be marred. If I want to draw a figure completely, and have to draw over something else in order to do it, that's okay. It's pretty daunting for me, but I think that by doing this, I can only improve. Furthermore, I'm going to distance myself from drawing digitally for a while. We'll see how this works out.
Harddrive Woes
Finally, something bad happened to my computer yesterday. Well, not terrible, but pretty bad. Windows reported the imminent failure of one of my hard drives. My setup's fairly secure in this regard - Two 60GB SSDs set to RAID1 for my OS and some incidental applications, Two 1.5TB drives in RAID1 for larger applications, games and important data. Then one 2TB drive for videos - mostly TV shows and movies. (Note: RAID1 means that between two drives, one is a direct copy of the other, for backup purposes). It's this last one that's failed. Funny how it's also the only one that doesn't have a redundant backup. It's also the newest.
Initially I could access my files, so I was trying to use Windows 7's backup functionality to copy its contents to another drive. This... didn't work out so well. So I tried some 3rd party applications. Gradually the state of the drive was decreasing, until finally I couldn't access the drive and the computer saw it as an unformatted disk. Chances are that the drive itself is physically malfunctioning, but I really don't know. I'm trying one last ditch effort to salvage the data, but my hopes aren't particularly high.
The thing is, whenever something in my computer fails, out of sheer hubris, I don't just replace it with equal parts, but I tend to go a bit overboard in general. The first problem I'd encountered a couple years ago was my SSD (of which I had only one, for the operating system) failed. In retaliation, I bought two of the newer model (same capacity) and set them up in RAID1. A few weeks later I got a new SSD in the mail as a replacement from the manufacturer. This one I set aside for a rainy day. Back in November, my video card's fan started having issues. So, I replaced it with a newer model with twice as much memory.
Those last two upgrades are pretty reasonable - first one made the problem less likely to be less crippling. The second one was even more reasonable, since I had to replace the card anyway, why not get one that'll be a wee bit more future proof. But this time? I'm a bit ashamed of myself.
So I went to the store and picked up a 3TB drive to replace my failed 2TB HDD, and while I was there, I picked up two 128GB OCZ Vertex4 SSDs. Why? I don't really need them, but it was bothering me a bit that my C drive (the current RAID1 60GB SSDs) has only about five or six gigabytes free. So, while replacing my failed hard drive, I'm going to clone the C drive over to a new array of SSDs. Totally unrelated to the problem at hand, and kind of wasteful. Although they were on sale. $50 off on each one is nothing to scoff at. I'm also thinking of dropping in that rainy-day 60GB SSD as a dedicated scratchdisk for photoshop, and keeping the current RAID1 SSDs in case my drives fail in a truly catastrophic manner (despite the redundant backups) and I urgently need something with an OS on it.
For now, I'll wait for my final recovery attempt. It'll probably take another eight hours to run the scan, which is a painful wait, but worth it for my 400GB anime collection. I think I'll go doodle in my sketchbook for now!
Edit: The recovery attempt with Seagate File Recovery was successful! Unfortunately, copying my OS drive over didn't work as planned, and I ultimately ended up doing a fresh install of Windows. Probably for the better though, it's always good to do a clean format every once in a while.
Sunday, June 17, 2012
Saturday, June 2, 2012
CHoW #290
I don't feel as though this is really progressing anymore, so I think I'll stop. I feel like the design itself is what's tripping me up on the illustration - the face area, with the mask and the beast's jaws/teeth are too confusing, and it's difficult to tell what's what. Of course, that was my intention, but it didn't work out as well as I'd hoped it would. It's complete enough, though, for me to submit it to the CHoW challenge for this week - it's been a good while since I've done that.


Wednesday, May 30, 2012
CHoW #290 - Rough Idea
I didn't really intend to bother with this week's CHoW, and I'm still not sure if I'll bother much more with it, but I had an idea floating around and figured it wouldn't hurt to vomit it onto a Photoshop canvas. The theme is "Guardian of the Flame," specifically the olympic flame. A pretty weird brief, if you ask me. I don't do many creatures, but this week's brief stipulated that it didn't have to be humanoid, and I felt somewhat inspired by the lions I was doodling yesterday, and a few pictures of hulking tigers I glanced at today.

Edit: Worked on it some more.


Edit: Worked on it some more.

Tuesday, May 29, 2012

Monday, May 28, 2012
Horsies!
Been a while since I did some aimless doodling, so here are some horses. The bigger one was done upside down, because I couldn't seem to be able to do it right-side up. Why horses? Why, several reasons! Because I'm generally bad at drawing horses, and also I was reminded of that fact when Jane mentioned that she was contributing to a group-effort of drawing the original 151 pokemon (kind of like Pokemon Battle Royale). She's doing Rapidash.


Sunday, May 27, 2012
ImageMagick, Imagick, and whatever the hell else you want to call it
So I'm a GD boy, when it comes to writing php scripts to build and manipulate images - or at least, I have been for quite some time. I never ventured into ImageMagick, largely because it was significantly less accessible, what with having to be enabled on the server and all that. Besides, until recently I never really needed anything so complex that GD couldn't do the trick.
Yesterday I was experimenting with my avatar bases for AoA. I'm currently painting them in greyscale, then applying a single layer set to the "Color" blend mode in Photoshop. This way, I can make any tweaks I want to the value aspect of the image without having to redo several versions of the base (specifically the various skin tones). Unfortunately, as far as I could tell at that point, I was going to have to save off individual versions of the base for each skin tone, which was not at all something I was looking forward to.
So, as a programmer, I try to facilitate my laziness by writing code, and this time I went on a hunt for a native GD function that would allow me to blend two images together. I found a function that worked similarly to the "Overlay" blend mode (if you're in need of this kind of a function, look into the GD function, imagelayereffect() with the effect IMG_EFFECT_OVERLAY). Unfortunately, this was not exactly what I was looking for, and resulted in some very harsh lighting effects. In the end, I ended up writing a script to scroll through each pixel, convert RGB values to HSL, pull the hue and saturation and dump it into the greyscale image. It worked pretty well, but took a couple seconds. Combined with caching, this was a workable solution, but could not be extended much further, say, if I wanted to work with numerous layers all being processed individually in series.
At this point, I didn't need anything more than that, so I could have settled down with GD and things would have been fine. Fortunately, I don't settle easily, and I wanted to see if there was a better way. In comes ImageMagick. Note: it feels extremely different from GD, and documentation for the PHP functions is piss-poor. This is because ImageMagick is primarily intended to be used through a command-line, and the PHP functions attempt to abstract the commands into something more OOP-friendly.
I ultimately found that I understood better by working with the command-line functions, which can be used directly from PHP using the exec() function. I don't know much just yet, but from what I've gathered, the basic anatomy of a command is as follows:
convert - starts the command
file1.png, file2.png, file3.png - names of existing files in the folder from which the php script is being run
+append - a command that flattens the image down and places the 'layers' side by side horizontally. Conversely, -append could be used to arrange them vertically.
file123.png - the file name of the resulting image, saved relative to the php script's location in the file system.
Fairly easy to understand. It took some doing, but I eventually found a command that allowed me to achieve something *fairly* close to what I wanted, in this form.
For all intensive purposes, this worked. I made a few adjustments, tinkering with levels and brightness of the resulting image (because Photoshop's color blend mode actually tinkers with the value levels a bit), but most importantly I ultimately decided to rewrite this using the PHP Imagick functions, as follows:


Yesterday I was experimenting with my avatar bases for AoA. I'm currently painting them in greyscale, then applying a single layer set to the "Color" blend mode in Photoshop. This way, I can make any tweaks I want to the value aspect of the image without having to redo several versions of the base (specifically the various skin tones). Unfortunately, as far as I could tell at that point, I was going to have to save off individual versions of the base for each skin tone, which was not at all something I was looking forward to.
So, as a programmer, I try to facilitate my laziness by writing code, and this time I went on a hunt for a native GD function that would allow me to blend two images together. I found a function that worked similarly to the "Overlay" blend mode (if you're in need of this kind of a function, look into the GD function, imagelayereffect() with the effect IMG_EFFECT_OVERLAY). Unfortunately, this was not exactly what I was looking for, and resulted in some very harsh lighting effects. In the end, I ended up writing a script to scroll through each pixel, convert RGB values to HSL, pull the hue and saturation and dump it into the greyscale image. It worked pretty well, but took a couple seconds. Combined with caching, this was a workable solution, but could not be extended much further, say, if I wanted to work with numerous layers all being processed individually in series.
At this point, I didn't need anything more than that, so I could have settled down with GD and things would have been fine. Fortunately, I don't settle easily, and I wanted to see if there was a better way. In comes ImageMagick. Note: it feels extremely different from GD, and documentation for the PHP functions is piss-poor. This is because ImageMagick is primarily intended to be used through a command-line, and the PHP functions attempt to abstract the commands into something more OOP-friendly.
I ultimately found that I understood better by working with the command-line functions, which can be used directly from PHP using the exec() function. I don't know much just yet, but from what I've gathered, the basic anatomy of a command is as follows:
convert file1.png file2.png file3.png +append file123.pngThe above command opens three separate files and puts them into your working space. You can imagine this as being three files opened as layers on top of each other if you like, but you can also imagine them to be opened one beside the other. All that matters is the order; file1 comes before file2, which comes before file3. The command then flattens them all down, placing one after the other horizontally, and then saves them as file123.png.
convert - starts the command
file1.png, file2.png, file3.png - names of existing files in the folder from which the php script is being run
+append - a command that flattens the image down and places the 'layers' side by side horizontally. Conversely, -append could be used to arrange them vertically.
file123.png - the file name of the resulting image, saved relative to the php script's location in the file system.
Fairly easy to understand. It took some doing, but I eventually found a command that allowed me to achieve something *fairly* close to what I wanted, in this form.
convert female_base.png female_colour_peach.png -compose colorize -composite result.pngHere, -compose seems to be setting the blending mode to colorize, while -composite seems to flatten the whole image down as though they were layers placed on top of each other. Remember, I'm merely recording my own findings, so I may not be entirely correct in my assumptions. All I know is that this worked fairly well. It carried the hue and saturation of my female_colour_peach.png image and applied them to the corresponding pixels of the female_base.png image, whilst retaining the original brightness/value.
For all intensive purposes, this worked. I made a few adjustments, tinkering with levels and brightness of the resulting image (because Photoshop's color blend mode actually tinkers with the value levels a bit), but most importantly I ultimately decided to rewrite this using the PHP Imagick functions, as follows:
$base = new Imagick("female_base.png");Having written out the code as a command afforded me a greater understanding of how the Imagick PHP functions work. Here, I'm pretty much doing the same thing. I open my files, then I use compositeImage() to paste my $overlay image on top with a blend mode of COLORIZE (the 0,0 are referring to x,y offsets). Then I tinkered with the levels of the image with levelImage() and finally the brightness, saturation and hue with modulateImage().
$overlay = new Imagick("female_colour_peach.png");
$base->compositeImage($overlay,imagick::COMPOSITE_COLORIZE,0,0);
$base->levelImage (0, 1.21, 65535 * .85);
$base->modulateImage(100,125,100);
And the final result is...


Saturday, May 26, 2012
AoA: Female Avatar Base
For the past couple days, I've been working on a female avatar base, whose pose has been based heavily on the male character's. This is primarily because it would make it much easier to take a design made for one gender and apply it to the other with minor modifications.
I was also thinking - maybe I'll scrap the fat option, as I'd shown it on the male avatar in my previous post. It's not because I have anything against the obese! I just feel that a fatter base causes minor changes to the shape of the torso, so clothing that is placed on top of it would not necessarily fit correctly. Furthermore, since I can blend between normal and very muscular, but not from normal and fat, it sticks out awkwardly.
So here's the female, normal and super-fit.
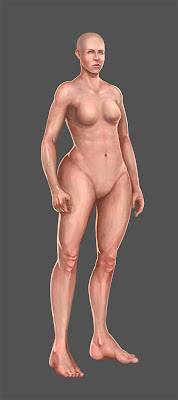

And here she is wearing some of those fancy doodads called 'clothes'.

Thursday, May 24, 2012
AoA: Level of Avatar Fitness
So I'm toying with the idea of giving avatars several points of customization, since as long as I'm not changing the overall silhouette of the figure, I shouldn't run into too much trouble with avatar clothing. Although I can see a few minor problems that can hopefully be ignored or be fixed later.
Here's the three basic levels of fitness. Extremely muscular, average, and chubby. Since none of the features actually move between the first two, I could give players the option to scrub between the two and find whatever level they're happiest with, but unfortunately that cannot be done with the chubby option.


Here's the three basic levels of fitness. Extremely muscular, average, and chubby. Since none of the features actually move between the first two, I could give players the option to scrub between the two and find whatever level they're happiest with, but unfortunately that cannot be done with the chubby option.


Wednesday, May 23, 2012
AoA: Male Avatar... Genetalia?
Today's question is... Should I include the genitals (nothing detailed) or go ken-doll like most RPGs? I briefly asked Ethan that question, and he responded rather childishly - saying that it would be immature to give male characters genitalia. Weird kid. Anyways, I'll leave them on a separate layer and turn them off for now. I can always decide on it later on, and even leave it as a user preference to toggle them on or off.


AoA: Male Avatar Base
Ian thinks that this may be overly detailed, to the point that players would not be able to easily make clothes that would match. He may be right. At the very least, though, I can see the avatars having all sorts of customization options - the face, the level of musculature, etc.
I'll update this post instead of sticking up multiple posts of the various stages of the avatar base.
I'll update this post instead of sticking up multiple posts of the various stages of the avatar base.


Subscribe to:
Posts (Atom)